Ladder Logic Programming Tutorial   STEP1      backbutton.gif (507 bytes)  nextbutton.gif (690 bytes)

Before we commence the circuit creation, let us define the I/Os to be used for this program. The following I/Os are required:
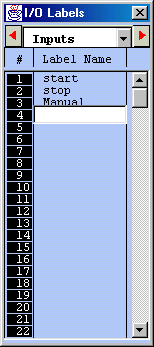
Inputs : Start, Stop, Manual, Step
Outputs : Out1, Out2,.... Out8
Relays : Run
Timers : Duration
Sequencer : Seq1

  1. Open up the I/O label editing Window by pressing <F2>. (Although you can also click on "Edit" menu and select the item "I/O Table" to achieve the same, we strongly recommend learning the hot key F2 as it is often much more convenient to use).
  2. Scroll to the "Inputs" window by using the left/right cursor keys or by clicking on the red color left/right arrow buttons or simply select it from the choice box between the left/right arrow buttons.
  3. Move the deep blue color highlight bar to Input #1 position by clicking on it. Click again to open up a text field for entering the name for Input #1.
tutorial1a1.gif (6749 bytes)
  1. Enter the name "Start" for Input #1. Press <Enter> key to accept the name. The text field will be closed and the name "Start" is now assigned to  Input #1. If you made a mistake, simply press the "spacebar" or click on the input location again to edit it.

  2. Press <Enter> key again and the highlight bar will be moved to Input #2.
  3. Without using the mouse button, simply start typing the name "Stop" at Input #2. The text field will be automatically opened up at Input #2 for entry. Press <Enter> after typing in the name for "Stop" input.
  4. Complete entry of the other two input label names "Manual" and "Step" as above. Note that if you enter more than 10 characters in the text field, only the first 10 characters are accepted. Also, white spaces between names are not acceptable and will be automatically converted to the underscore character ( '_' ). e.g. If you enter the name: "M series PLC" for an I/O, it will be accepted as "M_series_P".
  5. After entering label names for Inputs #1 to #4, move to the "Output" table by pressing the right cursor key or by clicking on the right arrow button. Enter all the output and relay label names in their respective I/O tables. We will discuss the "Timer" table in the next step.

Important Notes

  1. You can shift the Items in the I/O table up or down or insert a new label between two adjacent, pre-defined labels. Simply press the <Ins> key or Right-Click the mouse button to pop up the "Shift I/O" menu  which allows you to shift the selected I/O. However, please note that if you shift the I/O down, the last entry in the I/O table (e.g. Input #256) will be lost.

  2. TRiLOGI Version 6 allows I/O label names of up to 10 characters. However, if you wish to keep compatibility with Version 4.x you should use no more than 8 characters to define the I/O names. (Note, For some international languages if the character widths are too big the label name it may not show up properly on the ladder diagram. If that is a problem then please reduce the number of characters use for the label name.


Back to Assignment backbutton.gif (507 bytes)     nextbutton.gif (690 bytes) Go To STEP2