Setting Up TLServer's Serial Communication Port
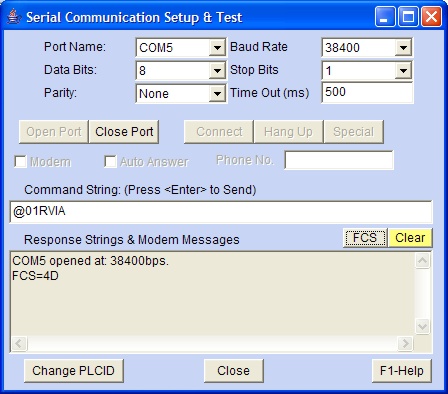
This dialog box allows you to configure the serial port of the host computer to match the setting on the PLC for proper communication. Most of the items here are self-explanatory. If you have more than one PLC connected to the host computer via RS485, all the PLCs must have the same serial port settings as the TLServer. The
button allows you to test whether the communication port is available to TLServer. You can also click the
button to temporarily relinquish the port to other applications. Note that you will need to close an opened port before you can change its parameter.
The (Command String) text entry field allows you to test communication with the PLC using its native or MODBUS ASCII protocols. If you enter a string here and press <Enter>, the ASCII string will be sent to the PLC connected to the serial port and the response string will be displayed in the bottom text box. If the comm port is not yet opened this command will automatically open it.
Note that only multi-point host link commands are accepted here. The only point-to-point command acceptable here is the "IR*" command which queries the ID address of the PLC.
If you have only one PLC connected to your TLServer computer, then you can test the communication now using the following command string:
Command String : IR*
Response String: IR01*The response string tells you that the ID address of this single PLC is 01. You can then try other host link commands using this ID address. (e.g. @01RI0000* to query the states of inputs #1 to #8) If you have more than one PLC connected you should not use the "IR*" since all connected PLCs will try to respond simultaneously, thus resulting in a garbage return string.
To change the ID of a PLC, e.g., from 01 to 05, you can send the command string "@01IW0500*" to the PLC. There is also a
button which does this for you automatically. You can click on the "Detect ID" button to check the current ID and then the "Change ID" button to write the new ID to the PLC. If the response string box become too cluttered, click the
button to clear the response box content.
The
button can be used for computation of the "FCS" (Frame Check Sequence) characters from whatever text string you enter in the Command String box. In the above example, since there is currently a text string "@01RVIA" in the Command String box, clicking on the
A. Changing Communication Settings
Most likely you may want to leave the comm port settings at their default values: 38,400 bps, 8 data bits, 1 stop bit, no parity. Some reasons for changing the comm port settings may be due to the need to change the PLC's serial port to lower values (e.g. for communication via radio using 9600 bps). Changes to the comm settings are saved to the TLServer configuration file: "tlserver1.cfg" when you quit TLServer.
One other scenario is when you need to power cycle an M-series PLC with DIP switch #4 turned ON (to halt the CPU to disable the "1st.Scan" pulse). Since the PLC's serial port is set to 9600 bps when power ON with DIP Switch #4 set, you will need to change the baud rate temporarily in order to communicate with the PLC (e.g to blank out a program that causes trouble).
However, do remember to change the baud rate setting back to 38400 bps after you have reset the PLC with the DIP switch OFF, otherwise you may have problems communicating with the PLC later on since changes to comm settings are automatically saved.
NOTE: The Nano-10, FMD and F-series PLCs will be forced to the default baud rate of 38400 bps with 8 data bits, 1 stop bit, and no parity when started in pause mode (for all 3 serial ports). These newer PLCs will NOT be forced to 9600 bps unlike that of the RS232 port on the M-series PLCs.
B. Modem Support
1. Dial Modem: TLServer 3.x incorporates support for dialing a modem connected to the PC's com port. This is useful if the PLC has to be located at a remote location yet still has access to the public telephone line or to a cellular phone. You can then connect the PLC to a standard analog modem such as the US Robotic 33.6Kbps or Hayes Acura smart modem. The TLServer can then dial the phone number of the remote modem and make a connection. Once a connection is established, the remote PLC is immediately accessible to client applications such as i-TRiLOGI or TRi-ExcelLink, etc over the Internet, Intranet or localhost as if it were connected to the TLServer via the serial port directly
Notes:
- Due to the time delay for modulation/demodulation process as well as transmission delay, two-way communications via modem tends to be noticeably slower than connection made by direct cable connection. This is quite normal and does not indicate a problem with the communication setup.
- The PC's modem must be able to emulate the COM port of the PC in order for the TLServer modem function to work. Some of the newer computers employ "win modem" or "soft modem" which may only work with Windows' dial-up networking. These kinds of modems are implemented in software and they do not necessarily emulate a standard PC COM port properly. They also demand quite a bit of CPU power to process the communication properly. Therefore these type of modems may not work too well with the TLServer. If your built-in soft modem does not work properly with TLServer, you should get an external PCMCIA card modem and these are quite inexpensive nowadays and they will work much better with the TLServer modem support function.
To setup TLServer to dial a modem, first close the active COM port by clicking on the "Close Port" button. Select the COM port where the modem is connected to. (you can find out the which COM the modem is connected to by checking the "Control Panel -> Modems -> Properties") Click to select the "Modem" checkbox. You will then be able to enter a telephone number to dial. The 3 buttons: "Connect", "Hang Up" and "Special" become enabled when you select the "Modem" mode. Note that the "Baud Rate" field now becomes the "DTE speed" which specify the line rate between the PC and the modem (this has nothing to do with the actual baud rate between the modems which will be automatically negotiated based on the quality of connection). Normally you should leave the DTE speed set to the highest value (115200) unless your modem manufacturer specifies otherwise. The PLC can be operating at a different baud rate from the PC to modem-line-rate because of the modulation/dimoduation action of the modem.
* Important: The PLC-to-modem connection must be properly prepared before you can use TLServer to connect to the PLC's modem. Click here to read more details about the PLC-to-Modem Communication Setup.
Once you have entered a proper phone number, click on the "Connect" button to start dialing the modem (make sure that the "Auto Answer" check box is not checked). If the remote modem is busy or does not answer the call you will see the corresponding error messages in the response box. Click on the "Hang Up" button anytime to abort the dialing operation.
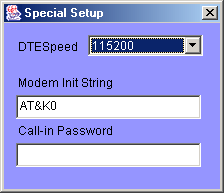
If you click on the "Special" button a special dialog box will appear as follow:
- You can change the DTE speed by selecting a new value from the choice menu.
- You can specify a special AT command to be sent to the modem during modem initialization. Normally you can leave this field to its default value which is AT&K0.
- You can also specify a special "Call-in Password" which is only used if the TLServer puts itself in auto-answer mode (see description later). Any incoming connection made by a remote modem must give the correct password upon connection, otherwise the connection will be immediately dropped. The Call-In password feature is disabled if the corresponding textbox is empty.
2. Auto Answer: If you select the "Auto Answer" checkbox and click on the "Connect" button, the TLServer will setup the modem to automatically answer the incoming call on the first ring. There are many uses of this capability:
- Any number of PLCs in the field can periodically dial in to a single TLServer and write or append the values of their internal variables to data files on the PC's hard disk using the PLC File Service commands. This is extremely useful for deploying the M-series/F-Series PLC for data-acquisition purposes. You can format the data using CSV format so that the file can be readily imported into an MS Excel or Lotus 123 spreadsheet.
- The remote PLC can dial in and ask TLServer to send out its data to any email address immediately.
- The remote PLC can dial in and synchronize its real time clock with the TLServer.
- The TLServer can play the role of an ISP where the PLC can dial in and be accessible to the Internet.
Some sample ".PC6" programs that enable a PLC to dial in to the TLServer and request for file or email services are provided in the following folder:
"C:\TRiLOGI\TL6\usr\samples\FileService_Modem"
To prevent unauthorized incoming call, you can specify a "Call-In Password" string as described above. If the "Call-In Password" contains any text other than an empty string, then the incoming caller, upon connection, must immediately send a CR-terminated string that matches the "Call-In Password" string in order to maintain the connection. If the password is incorrect the TLServer will disconnect the remote modem to prevent unauthorized access. If the call-in password is validated the TLServer will acknowledge this by sending a CR-terminated string "<OK>" to the remote PLC via the modem. It is the duty of the incoming caller to check the acknowledgement string to ensure that the connection is not dropped by the TLServer.