Before the Ethernet port was integrated into the newer Super PLCs such as
the Nano-10, FMD and F-series, TRi PLCs can only use the TLServer as TCP/IP gateway to
perform network related functions, including sending of emails. For newer PLCs with
built-in Ethernet, in many cases the PLC can be setup to send email directly without
relying on the TLServer. However, TLServer can still be very useful as email helper in the
following situations:
1) There is no Ethernet cable available to the PLC but the PLC are
networked via RS485 to a PC.
2) The PLCs are not permitted to make TCP connection directly to SMTP server residing
outside of the LAN.
3) The SMTP server requires authentication to send email that the PLC cannot handle
natively.
The following describe in details the several ways in which the TLServer
can be used to help the PLC send out emails.
The TLServer supports a legacy email feature (carried over since version
1.0) where the TLServer act as a master to a bunch of PLCs connected together via their
RS485 port. TLServer can be configured to scan the internal variables of any of the up to
256 PLCs ID connected to it to determine if any of these PLCs has a request for the
TLServer to send out email. If so the TLServer will then retrieve the email data from the
relevant PLC, constructs a complete email and send it out. Click here for more details.
In this setup, the TLServer will monitor the data it receives via its
serial port for a special <EMAIL> tag, which triggers a sequence of actions where it
receive the sender, recipient, subject and mail content via the serial port. When all the
data have been received the TLServer will connect to the SMTP server and send out the
email. In this setup only 1 PLC may be connected to the TLServer to send out emails since
it is a one-to-one interaction between the PLC and the TLServer program. For more details
on this email method, please click here
to go view File and Email Services.
As you will see shortly, since version 3.16, the TLServer can be setup to
work with both SMTP servers that require authentication and those that don't. However, the
default email function on the Nano-10, FMD and F-series PLCs does not support account
authentication to communicate with the external SMTP server. If the PLC is connecting to
the SMTP server provided by the ISP then in many cases authentication is not needed since
the ISP will only allows connection from IP address that belongs to its subscribers.
However, if your SMTP Server is not supplied by the ISP of the network to
which the PLC connects, then most likely authentication will be required. In such a case
the simple <EMAIL> tag method described on the PLC's manual will not work since the
PLC does not handle authentication with the SMTP server.
It is possible to program the PLC to handle unencrypted authentication
with the SMTP server using complex TBASIC statements in order to send email (see examples
described on the forum under "Frequently Asked Questions"). However, to simplify
programming effort, we have introduced a new, "Email Relay Server" feature to
TLServer starting from version 3.17. The "Email Relay Server" feature is for the
TLServer to act as a pseudo, unauthenticated SMTP mail server to the PLCs and receive the
email data from the PLC. It then in turn connects to an authenticated SMTP server and
"relay" the email data to the actual SMTP server. In order to use this feature,
the PLC would configure its SMTP IP address to be that of the IP address of the PC that is
running the TLServer, and the SMTP port to that of the "Port # to Relay PLC
Email".
The Email Relay Server can be any PC on your LAN that runs the TLServer
that is already configured to work with an external SMTP mail server (whether autheticated
or not). Your PLCs on the same LAN can then send their email via this TLServer instead of
directly to the external SMTP server. This could be advantages in terms of ease of
programming and also should the company decide to change its ISP or SMTP server provider,
only the TLServer needs to be re-configured and the PLCs on the network need not be
configured individually to address the change.
NEW!: TLServer version 3.17 offers a whole new look to the Email Setup,
which has all the same features as before plus a couple of additions, including Port No.
specification, optional Authentication and a Test Email function to test the settings you
have entered. See below for descriptions of the additions.
To setup the server to handle email requests, click on the "Setup
Emails" button on the TLServer to open the following dialog box:
- SMTP Mail Server: This will be the same Outgoing Mail Server that you
use in your email program such as the Eudora or Outlook Express. If in doubt, ask your ISP
or System Administrator for help. This server must be setup properly before the TLServer
can send any email.
- SMTP Port No.: This is the port that your Outgoing Mail Server will use
to send emails. The default port number is 25, which is the most common port; however,
some Mail Servers will use a different port and you should check with your ISP or System
Administrator if you are not sure.
- Authentication: Some ISPs will only allow mail to be sent through their
Mail Server if it originates from a trusted IP address (typically, only the Internet IP
address that the ISP assigns to you). If this is the case, then you may need to
authenticate your IP address if it is different from the one provided to you (If you are
sending mail from a location registered to another ISP using your Mail Server). If your
ISP uses Authentication, then you will need to check the Authentication box and provide
the correct Auth. Username and Auth. Password. If you are unsure about this, then you
should contact your ISP or System Administrator for help.
- Auth. Username: If Authentication is required, you will need to provide
the correct Username. This is provided by your ISP and you should contact your ISP or
System Administrator if you don't know what it is or if you don't know if you need it.
- Auth. Password: If Authentication is required, you will need to provide
the correct Password. This is provided by your ISP and you should contact your ISP or
System Administrator if you don't know what it is or if you don't know if you need it.
- Port # to Relay PLC Email: If the TLServer is setup to be the
email relay server for the PLCs, TLServer will be listening on this port for a SMTP
connection from the PLC. The default port number is 9025. This port number is to be
used as the SMTP port # on the PLC's "Ethernet & ADC Configuration" screen
in order for the TLServer to relay the email content to the actual
SMTP server that requires authentication. Please see Email Method 3 -Using TLServer as Email Relay
Server for description onon this topic)
Important: your PC's firewall
must be setup to allow connection to this port from other devices on your network in
order for TLServer to work as an email relay server for the PLC.
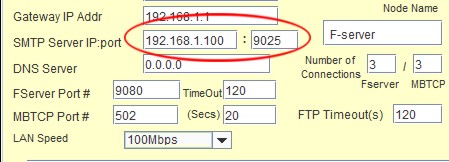
E.g. If the PC running the TLServer has IP address = 192.168.1.100, and the "Port
# to Relay PLC Email" is set to 9025, then if the PLC wants to use TLServer as a SMTP
relay server, it should configure its Ethernet port settings as shown below:
|
 |

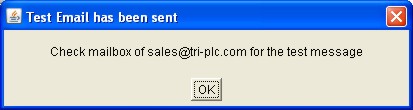
You can test your email configuration by clicking the button once you have
entered all the correct settings. Once you click the "Email Test" button
TLServer will initiate the sending of a test email using the Mail Server you specified. A
new window will pop up, as shown below, that allows you to enter the recipient email
address.

Once you have typed the recipients email address, you can press enter to send a default
email (can't be changed). If it works, you will see a message window that says the email
has been sent, as shown below, and you will receive an email with the following content:
"Test Message sent from TLServer"
If some settings in the email configuration are not correct or you do not have a
working Internet connection, you will see an error message.

If you use the TLServer email relay feature and encounter failure when the PLC attempts
to email and if you cannot figure out what caused the problems, then you can start upthe
TLServer with Java Console enabled and re-run the email test with the "Debug"
checkbox selected. The Java console will output all interactive messages the TLServer
exchanges with the SMTP server. From the error messages produced you may be able to better
figure out the cause of the email failure.
Note: TLServer automatically enables debug messages when you use the "Email
Test" button to send a test email via the SMTP server, regardless of the state of the
"Debug" checkbox. The "Debug" checkbox is effective only when TLServer
carries out the the email relay operations on behalf of the PLCs. |
A PLC program raises an email request flag by setting the variable
emEVENT[1] to a non negative value (see explanation on "Writing i-TRiLOGI Programs that Can Send Emails")
whenever it needs to send an email. The TLServer, upon sensing that an email request flag
has been raised, will extract the sender, recipient and message strings from the PLC's
internal variables and send them out using the pre-defined SMTP outgoing mail server.
A single TLServer can service the email requests for one or more (max. =
256) PLCs connected to it via RS232 (single PLC only) or RS485.
The second half of the Email Setup screen with the title "Legacy
EMail Feature (from TLServer 1.0)" are related to this email method. The setup
is as follow:
- PLC ID# column: For you to select PLCs with ID from 00-FF
(256 in total) to set the email service period.
- Check Every (seconds) - this allows you to define how often the
TLServer should check the PLC (the email service period) for the state of the
outgoing email request flag.
Simply click on field next to the PLC ID# of interest to open up a text entry field (as
shown in the figure for ID=02). Enter a non-zero value (in seconds) to define its email
servicing period.
Note: Both SMTP Server and email service period definitions will be saved to the hard
disk when you exit TLServer program. They will be reloaded when you start TLServer again.
Inactive PLC
TLServer attempts to communicate with every PLC that has a non-zero email service
period. However, if the PLC is inactive (e.g. It has not been turned ON or has been
disconnected from the server) the communication will fail. Since communication failure
takes considerable amount of CPU waiting time and could affect the normal communication
with other active PLCs, inactive PLCs are internally marked by the TLServer (shown
as  message in the email setup dialog) and will not be checked according to their defined
service period to avoid repeated communication failure. However, TLServer will
re-scan these inactive PLCs every two minutes to check whether they have come
on-line. If an inactive PLC is found to respond to command it will be unmarked and
put back in service for its email request.
message in the email setup dialog) and will not be checked according to their defined
service period to avoid repeated communication failure. However, TLServer will
re-scan these inactive PLCs every two minutes to check whether they have come
on-line. If an inactive PLC is found to respond to command it will be unmarked and
put back in service for its email request.
You can also manually force the re-scanning of all PLCs by clicking on the  button once. Then scroll to the PLC of interest to check if there is a message. Check the PLC communication port wiring if there is an error.
This email service period does not determine how often the PLC will send email, since
email will only be sent when the email request flag is set even if you had set a very
short email service period. It only affects how quickly the email will be sent whenever a
PLC raises its email flag. You should set a short service period (say every 10 seconds)
for urgent email (such as alarm condition). For non urgent email such as hourly or daily
production report you can set a much longer servicing period to reduce the communication
loads on the PLCs.
|
In order to send an email, the i-TRiLOGI program needs to use the string variables A$,
B$, C$ to store the headers and D$ to Z$ to store the messages. (not all strings
need to be used, unused strings are still available for normal program use) The special
variable emEVENT[1] is used as an email request flag which should be initialized to -1
when the program is not requesting email service. When the i-TRiLOGI program wants to send
an email, it first stores the sender, recipient and subject into the following variables:
| A$ |
Sender email address - which can be used to identify the source of the
email. |
| B$ |
Recipient email address - this one must be accurate |
| C$ |
Subject of the message. |
| D$ |
First line of Message |
| E$ |
Second line of email message |
| ... |
..... |
| Z$ |
The 23rd line of the email message |
| emEvent[1] |
-1 = NOT sending any email.
0 to 23 = number of lines in the email message body which are contained in D$ to Z$. |
The maximum number of lines in your email is limited by the number of
string variables D$ to Z$ (23 in total) available in the M-series and F-Series PLCs.
For example, if the PLC needs to send email to trilogi@yahoo.com with a 1-line
greeting, then the program needs to activate a custom function that contains the following
statements:
A$ = "Demo1@PLC"
' sender
B$="trilogi@yahoo.com" ' recipient
C$ = "This is an email demonstration"
' subject
D$ = "The time is"+STR$(TIME[1])+":"+STR$(TIME[2])+". How are you
doing?" ' Message body
emEvent[1] = 1
You must also setup the email service period (say every 10 second) in the "Setup
Emails" screen for this PLC. When the TLServer scans the PLC and found that its
emEvent[1] is set to 1, it will extract the headers and message body from the PLC's string
variables. Only A$ to D$ will be extracted in this example since the message
contains one line of body text only, as indicated in emEvent[1]).
TLServer will then contact the SMTP server to send out the email. In addition, after
processing the email request, the TLServer will set the emEvent[1] variable to a value of
"-1" (no email). Hence there is no need for the i-TRiLOGI program to worry about
clearing the email request flag after the email has been sent. In addition, this provides
a way for the PLC program to know whether the TLServer is functioning properly and whether
the email request has already been processed. However, do take note that even if the
emEvent[1] has been reset it does not guarantee that the email has been correctly
dispatched to the recipient. Success of emailing is subject to the proper configuration of
the TLServer, the network quality and availability of the SMTP server at the moment when
TLServer tries to send out the email. For urgent situations you may consider sending out
multiple emails periodically until the user has attended to the machine.